Sunday, April 30, 2006

IMBB #25: Individual Baked French Toasts


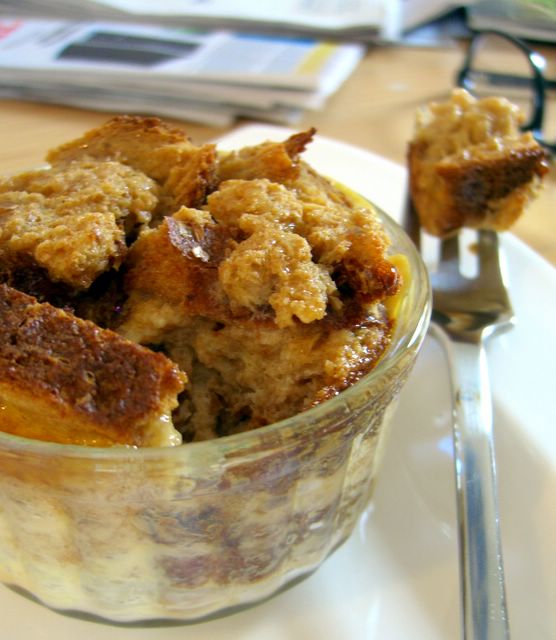
I know that this looks like bread pudding, but it's not. Really. I mean, I don't really like bread pudding and I do like french toast. Even when the french toast is disguised as a pudding, there is a difference and the difference is consistency. Generally, bread puddings have a higher milk-to-egg ratio than french toast does. While I do make a good bread pudding, it's just not my favorite thing to eat.
For this month's Is my blog burning? event, Derrick from Obsession with Food chose stale bread as the theme ingredient. Now, this would make an exceptional theme for Iron Chef America because it would really challenge the chefs to try and come up with something different. How many different kinds of bread pudding could they make?
Actually, there are many things that you can do with leftover bread, but to take advantage of its naturally sponge-like qualities, I did something bread pudding like and baked some individual french toasts. They're vey simple to make and an actually be done with fresh bread as well. You just tear up (or slice up) a few pieces of bread, toss them in some eggy batter and bake. The tops of the toasts get nice and crisp while the interior remains moist. I used whole wheat bread and left the crusts on, since it was a soft, sandwich loaf. The whole wheat gave it an extra layer of flavor and kept the dish tasting like breakfast-fare. You can certainly use a different kind of bread, if you like.
You can serve them directly from the ramekins, but you will probably want to place them on a plate, as the maple syrup you are going to use to drizzle over them just imight try to drip down the sides. The toasts can be prepared in advance and refrigerated overnight, though they make take a bit longer to bake in the morning. The test that they're done, simply insert a sharp knife into the center of one of the toasts. When it comes out (reasonably) clean, they're ready to eat.


Individual Baked French Toasts
2 eggs
1 cup milk
2 tbsp maple syrup
1/4 tsp salt (a good sized pinch)
1 tsp vanilla extract
4 slices of bread (sandwich-sized)


Preheat oven to 350F.
In a large bowl, whisk together eggs, milk, maple syrup, salt and vanilla extract until frothy. Cut or tear bread into small pieces, about 1/2-1 inch big. Place bread pieces into milk mixture and press down to soak it all up.
Divide evenly into four 6-oz. ramekins and place ramekins on a baking sheet.
Bake for about 25 minutes, until a knife inserted into the center comes out fairly clean.
Serve immediately.
Serves 4.

Friday, April 28, 2006

Whole Wheat Hamburger Buns


Everybody is interested in whole grain everything these days. While I am interested in having plenty of whole grains in my diet, I'm not that interested in having things that are enriched with whole grains, like a cereal that has 5% whole wheat flour or something. I like my grains to be either soft and white or totally wheaty. This isn't to say that I don't often mix flours for texture and flavor in my breads, because I do. I just don't call it something it's not.
These rolls are exactly what they say they are: 100% whole wheat flour buns. I started off the dough with little direction. I didn't know whether I wanted to do dinner rolls or a loaf of bread. At some point (most likely while I looked at the ground beef in my refrigerator), I thought "this would make a great hamburger bun." And so it does.
These buns have a great texture, a slightly crisp crust that softens as it cools and a moist, light interior. The rolls are satisfyingly flavorful, with just enough sugar to cover any hint of bitterness that whole wheat doughs can sometimes have and not make the bread sweet. The plainnes of the roll makes it very useful. It soaked up the hamburger juices beautifully, but would make a great cold sandwich roll, too. It can also be used to simply sop up marinara sauce or topped with butter and jam.
Store leftovers in a plastic bag. They'll be good for a day or two longer.


Whole Wheat Hamburger Buns
2 cups whole wheat flour, divided, plus more for kneading
1 cup water, warm (110F)
2 1/2 tsp active dry yeast (1 packet)
1/4 cup wheat bran
2 tbsp brown sugar
scant 1 1/2 tsp salt


Combine 1 cup whole wheat flour, 1 cup water and the yeast in a large bowl and stir well. Let it stand, covered, for 1-3 hours (time is flexible here), until nice and bubbly. This "sponge" will probably puff up, too. This is fine.

Stir the remaining flour, wheat bran, brown sugar and salt into the sponge. Add extra flour a tablespoon at a time until the dough pulls away from the sides of the bowl. Turn out onto a lightly floured surface and knead, adding extra flour as necessary to prevent sticking, for 6-8 minutes or until elastic. Place in a lightly greased bowl, cover with plastic wrap and let rise until doubled, 1 1/2-2 hours.

Turn risen dough out onto a lightly floured surface and divide into 6 equal portions. Shape into rounds and flatten (so they're approx. 3/4 inch thick) onto a lightly greased baking sheet. Cover rolls with a clean dishtowel and let rise for 45-50 minutes.
Meanwhile, preheat oven to 375.
Bake rolls for 19-20 minutes, until browned. They will sound hollow when the bottom is tapped. Let cool on a wire rack before slicing.
Makes 6 buns.

Thursday, April 27, 2006

Cooking School: Chocolate Marble Cake


Looking at the picture of Rorie's Chocolate and the Art of Low Fat Desserts to make the very came recipe. I won't go on about how much I love this cookbook (again), but I will say that this is an excellent cake and all the better because it's actually quite low in fat!
As with all of Alice Medrich's desserts, the recipe is very precise. She doesn't leave any room for error, but that is the best way to ensure consistency over and over again. My only real complaint about the recipe is that it takes a lot of bowls. You need a bowl for the flour, a bowl for the butter, a bowl for the chocolate and a bowl for the yogurt. I'm not such a huge fan of doing the dishes, but I can't seem to reduce that number when I'm making this. The only bowl that could be eliminated is the one which holds the yogurt, but I would actually prefer to have it in a bowl than to have to hold the yogurt in a measuring cup while I make the batter.
Once I have my million (meaning five) bowls out on the counter, measuring tools, ingredients and pan, I mix up the batter and pop it into the oven. I am not a big fan of swirling cakes as I am always concerned that I will somehow over-swirl the batter, eliminating the gorgeous contrast of black and white in the cake. The best way to avoid this is by dropping the batter in large dollops into the ban and running your knife through the batter only once. If you really like to keep your chocolate and vanilla separate, you can simply add all the chocolate batter on top of all of the vanilla batter and eliminate the swirl all together - two cakes in one!
The finished cake is moist and a bit heavy, satisfyingly like a pound cake. Instead of the unctuous butteryness of a pound cake, though, the flavor is light and has the tiniest hint of tang from the yogurt, but only if you know it's there. The chocolate is chocolaty, the vanilla is clear and, together, they make a great dessert.


Chocolate Marble Cake
(from Chocolate and the Art of Low Fat Desserts)
2 cups cake flour (8 ounces)
1 tsp baking powder
1/2 tsp baking soda
1/2 tsp salt
1 tsp instant espresso powder
1/3 cup unsweetened Dutch process cocoa
1 1/3 cups sugar, divided
1/4 cup water, room temperature
6 tbsp unsalted butter, very soft
1 egg
1 egg white
1 cup nonfat plain yogurt
2 1/2 teaspoons vanilla extract (divided)


Preheat oven to 350F. Grease a 10-inch tube pan.
Sift together flour, baking powder, baking soda and salt into a medium bowl and set aside.
Place yogurt into a small bowl and set aside.
In another medium bowl, whisk together espresso powder, cocoa, 1/3 cup sugar and 1/4 cup water until well combined. Stir in 1/2 tsp vanilla extract. Set aside.
In a large bowl, cream together the butter and the sugar until light, about 3 minutes. Beat in egg, followed by egg white, making sure that the egg is thoroughly incorporated before adding the white. Beat in 2 tsp vanilla extract.
Add the flour mixture to the butter mixture, alternating with the yogurt in three additions (flour, yogurt, flour, yogurt, flour) and mixing at low speed until just combined. Measure out 1 1/2 cups of the yogurt batter and stir into the cocoa mixture.
Spread 3/4 of the vanilla batter into the bottom of the prepared pan. Top with dollops of chocolate batter and top that with the last few dollops of vanilla batter. Use a clean bread knife to gently swirl the batter (make an "S" curve throughout) once.
Bake for 40-50 minutes, until a tester comes out clean. My 10-inch pan usually takes 40 minutes. If you are using an 8-inch tube pan, you will neet to aim for the higher end of the baking time.
Let the cake cool in the pan for 15 minutes before loosening it with a knife and turning it out to cool completely. Store well-wrapped at room temperature.
Serves 12

Nutritional Information: 230 calories and 6.9 grams of fat per serving.

Monday, April 24, 2006

Cinnamon Raisin Bran Muffins


I have mentioned before that I am wary of bran muffins, because more often than not they just aren't that good. They are overly bran-y, with a coarse, rough texture or they are practically dripping with oil, which neither improves the look or the taste of the muffin. I want bran muffins to be healthy and hearty, the sort of thing that you want to grab on your way out the door in the morning are still feel good about having done so at lunch.
This recipe is adapted from Sweet and Natural Baking, a book that uses natural sugars by concentrating fruit juice. I just use maple syrup when trying their recipes. These muffins also happen to be eggless and, since they were almost vegan already, I went ahead and used soy milk in mine. I liked the slight hint of vanilla from the soy milk and there was no soy-taste at all because of the fairly strong flavors in the muffin. You can definitely use plain milk, skim or whole, to make these.
The muffins are just sweet enough have a soft texture with a nice, wholesome flavor that is a combination of maple syrup and cinnamon. Since I didn't use muffin liners, the edges of the muffins were slightly crisp when they were just out of the oven. They don't have a coarse texture from too much wheat bran and they aren't oily in the least. They are actually quite low in fat. The only thing about these muffins is that they really are best on the day that they are made. The second day, even if wrapped, they will be on the dry side. If you're planning to make them are than a day ahead, you'll probably have to slather them with butter or jam. Not that there's anything wrong with that, of course.

Cinnamon Raisin Bran Muffins
(adapted from Sweet and Natural Baking)
1 cup all purpose flour
1/4 cup whole wheat flour
1/2 cup wheat bran
1/2 tsp baking soda
1/2 tsp baking powder
1/4 tsp salt
1 tsp cinnamon
1/8 tsp nutmeg
1/3 cup maple syrup (I used grade b)
3/4 cup vanilla soy milk (or skim milk with 1/2 tsp vanilla extract)
2 tbsp vegetable oil
1 cup raisins

Preheat oven to 350F. Grease 10 cups of a regular muffin tin.
In a large bowl, mix together flours, wheat bran, baking soda, baking powder, salt, cinnamon and nutmeg.
In a small bowl, whisk together maple syrup, milk and vegetable oil. Pour into flour mixture and stir until just combined. Stir in raisins.
Distribute evenly into 10 greased muffin cups.
Bake at 350F for about 15 minutes, until a tester comes out clean.
Makes 10 muffins (not 12)

Sunday, April 23, 2006

Sunday Brunch: Coconut Banana Macadamia Pancakes


Generally, I like my pancakes on the plain side. I go for buttermilk pancakes most of the time and, though I've been known to have a flavor or two, the thing that I most often add is blueberries. That being said, a little variation now and then is a good thing - hence the reason that I decided to cram so much flavor into these.
These pancakes are really a basic, plain pancake with a lot of stuff added to them. I added banana, shredded coconut and chopped macadamia nuts as a sort of tropical combination. The shredded coconut actually works really well in the pancakes and, though you could certainly use coconut milk in place of the regular milk, I think that the coconut flavor might overpower the others at that point.
I debated for a while about whether I should use butter or oil in these pancakes, especially since I have macadamia nut oil at home. At first I thought that using the mac nut oil would blend the flavors further, but it turns out that I prefered to have a bit of buttery flavor in the pancakes. The mac nut oil is extremely buttery for a vegetable oil, but the flavor was a little overpowering; the pancakes tasted a bit greasy. If you do decide to use a strong oil, I would recommending using only on tablespoon.
Back to the pancakes, though. The coconut and banana played off each other very well, and both of the flavors melded right into the pancake. The nuts are entirely optional. I like these with and without nuts, so add them according to your own preference for having crunchy bits in your pancakes. These don't really need syrup, since they taste great on their own, but I'm not one to argue against maple syrup.


Coconut Banana Macadamia Pancakes
1 cup all purpose flour
1 tsp baking powder
1/4 tsp salt
1 tbsp sugar
1 cup milk (non-fat is fine)
1 large egg
2 tbsp butter, melted
1/4 tsp almond extract
1/2 cup sweetened shredded coconut
1/4 cup mashed banana (about 1/2 large banana)
1/4 cup chopped macadamia nuts (optional)


In a large bowl, whisk together the flour, baking powder, salt and sugar.
In a medium bowl, beat together milk, egg, melted butter and almond extract. Stir in coconut and banana, then pour into flour mixture. Add the macadamia nuts and stir until almost smooth.
Heat a lightly greased griddle (or frying pan), over medium-high heat until a drop of water will dance around when dropped on the surface. Drop batter by heaping spoonfulls and cook about 2-3 minutes, until browned, before flipping to brown the other side. Continue until all pancakes are made and serve hot.
Serves 3-4.

Friday, April 21, 2006

Snickerdoodles


Snickerdoodles are sugar cookies that are coated in cinnamon sugar. They usually have a cracked appearance and I have had ones that are both crisp and chewy. There is an added bonus to the cookies in that they have a fun name to say. Snickerdoodle.
Snickerdoodles are probably the single least offensive cookie that there is - which is to say that they will appeal to everyone. There are people who don't like chocolate, nuts, raisins, etc. and these cookies don't have any of those things. They are buttery and sugary, though not really overly sweet as the sugar is tempered by the cinnamon and vanilla flavors. I have no doubt that, while they might not be the first cookie offered up by people who are asked about their favorite type, they will always be among the first to go at a party.
My theory on the popularity of this cookie is, I think, validated by the recipe I used. This recipe is Mrs. Snigg's Snickerdoodles from AllRecipes. It has over 1200 positive ratings and 1000 positive reviews. Almost everyone gave it 5/5 stars. How could I not make them?
As I suspected, this batch of cookies was excellent. They had a perfect balance of flavors and were addictive enough to make you reach for a second. My personal preference is for a slightly crisper cookie, so if you go with the high end of the baking time, you will get a crisper cookie, while the low end will get you a chewier one. Regardless of which way you prefer your cookies, they will be delicious.


Snickerdoodles
(from Allrecipes)
2 3/4 cups all purpose flour
2 tsp cream of tartar
1 tsp baking soda
1/4 tsp salt
1/2 cup butter, soft
1/2 cup shortening (nonhydrogenated), soft
1 1/2 cups sugar
2 eggs
2 tsp vanilla extract
2 tbsp sugar
2 tsp cinnamon


Preheat oven to 400F. Line a baking sheet with parchment paper.
In a medium bowl, whisk together flour, cream of tartar, baking soda and salt. Set aside.
In a large bowl, cream together butter and shortening, gradually adding the sugar until mixture is fluffy. Beat in eggs, one at a time, followed by vanilla extract. Gradually mix in the flour at low speed until a dough is formed.
In a small bowl, combine sugar and cinnamon. Roll 1-inch balls of dough in the mixture and place on baking sheet. Cookies will spread, so leave about 2-inches between cookies.
Bake for 8-10 minutes, until set.
Remove to a wire cooling rack immediately.
Store in an airtight container when cool.
Makes about 4-dozen.

Thursday, April 20, 2006

Cooking School: Multi-Grain Bread


I love multi-grain bread. I'm not talking about the kind that you buy in the supermarket, bagged and sliced next to the white bread. I'm talking about the hearty, flavorful kind that you can get on a sandwich at a really great cafe. It's the kind of bread that is invariably paired with a "California style" sandwich, the one that always seems to include tomatoes, avocado and sprouts. Of course, there might be other things on it, too, but such a sandwich is mostly about the bread.
I have wanted to make multigrain bread for a long time. I started with a recipe on the King Arthur Flour website and went from there. After a few substitutions and eliminating the sunflower seeds because I don't care for nuts in my sandwich bread, my multi-grain loaf was finished. And it was everything I could have hoped it would be.
The bread was hearty with an oaty, nutty flavor. It was moist and very substantial, but that is a trait that you want in a bread like this, since it can stand up to any filling. It can even stand up to a total lack of filling and be satisfying! The crust is thick and crisp, really excellent.
One of the things that really makes it work is the vital wheat gluten in the recipe. The gluten allows the bread to rise better, creating a lighter product. The "multi grains" in the bread have either low or no additional protein in them, so adding the gluten, which is extra protein, means that you are going to have a less-dense, more tender loaf. If you don't have vital wheat gluten, you can buy some from the Baker's Catalogue or look for it at a natural grocery store. If you do not use it, you bread will still taste good, but it will be on the dense side.
I love this loaf. It makes fantastic sandwiches and unbelievable toast. The only thing that I would consider changing is its size, to make a larger bread, because I definitely want more.


Multi-Grain Sandwich Bread
1 tbps active dry yeast
2 cups all purpose flour, divided
1/2 cup whole wheat flour
1/4 cup rye flour
1/2 cup cornmeal
1/2 cup whole rolled oats
2 tbsp powdered skim milk
1/4 cup brown sugar
1 1/2 tsp salt
1 1/4 cups warm water
1 tbso vital wheat gluten
1 tbsp vegetable oil


In a large bowl, combine all the ingredients, reserving 1/2 cup flour and mix well. Gradually add the remaining 1/2 cup flour, one tablespoon at a time, until the dough pulls away from the sides of the bowl. Turn out onto a lightly floured surface and knead until elastic, 4-5 minutes, adding an extra tablespoon or two of flour, if necessary. Place dough in a lightly greased bowl and let rise, covered with plastic wrap, until doubled, 1 1/2 - 2 hours.
Grease a 9x5-inch loaf pan. Gently deflate dough onto a lightly floured surface and shape into a loaf by rolling like a jelly-roll and tucking the ends underneat the dough. Pinch seam together and place, seam side down, in greased loaf pan. Cover with a clean dish towel and let rise until about 1/2 inch above the top of the pan, approximately 1 hour.
Meanwhile, preheat oven to 350F.
Bake loaf at 350F for 40 minutes, until dark gold.
Turn out from loaf pan and let cool completely before slicing.
Makes 1 loaf.

Tuesday, April 18, 2006

Lots of Crumb Cake


Crumb cakes differ from coffee cakes, though both often have streusel or crumbs component, because a crumb cake is mostly crumb. Sure, coffee cakes will have some on top or swirled throughout, but the bulk of the batter is cake. In this instance, the bulk of the "batter" was crumb.
The cake was a Martha Stewart recipe that I picked mainly on looks. Crumbs on top of a cake always look extremely appealing and promise to be buttery and sweet, cruncky and cake-like all at once. This one didn't disappoint in any way. The cake was moist and tender and the crumb topping was crunchy and sweet, though not sugary, with a melt-in-your-mouth butteriness. The amount of cinnamon was good, though next time I make this, I'll add a bit of allspice to kick up the flavor a tiny bit.
I did have a few small challenges when making the recipe. While mixing both the batter and the crumb mixture was very easy, the batter did not spread into the pan well at all! In fact, it only barely covered the bottom and I had such difficulty spreading it that I had to grease my silicone spatula to push it around. I still couldn't get it into the corners, though the batter does spread and rise as it bakes, so this turned out not to be a problem in the finished cake. The main difference from the published recipe was that the cake took longer to bake than specified. Marth's directions called for 20 minutes of baking time, while mine wasn't done for about 28 minutes. Not that that is a big deal, since I used a cake tester to check it if was done, but a flaw nevertheless.
The cake can be served while still slightly warm, but it can also be cooled completely and stored, wrapped, for 2 days.


New York Crumb Cake
(from Martha Stewart)
2 tbsp vegetable oil
4 cups ap flour, divided
1.2 cup granulated (white) sugar
2 ½ tsp baking powder
½ tsp salt
1 large egg
½ cup milk (lowfat is fine)
2 tsp vanilla extract
1 cup light brown sugar
1 ½ tsp cinnamon
¼-½ tsp allspice (optional)
1 cup butter, melted


Preheat oven to 325F and grease and flour a 9x13 baking pan.
In a medium bowl, whisk together 1 1/2 cups flour, the granulated sugar, baking powder, and salt.
In a large bowl, whisk together the egg, milk, canola oil, and vanilla. Mix the dry ingredients into the wet ingredients and spread into pan (you might want to grease your spatula). Set aside.
In another large bowl, whisk together remaining 2 1/2 cups flour, brown sugar, and cinnamon (and allspice, if using). Pour melted butter over flour mixture, and stir with a rubber spatula until large crumbs form. Spread evenly over batter in pan.
Bake at 325F for 25-30 minutes, rotating once, until a tester comes out clean.
Cool completely on a wire rack before serving in large pieces.
Makes 12 servings.

Sunday, April 16, 2006

Easter Egg Challah

Happy Easter everyone!


This year I wanted to do something a little different from the rather ubiquitous brunch muffins and fritattas (though I did those, too) and make a real show-stopper. I rather think that I did an excellent job with it, too. But let me stop patting myself on the back long enough to tell you how I did it.
The idea for this bread started when I saw Paul Hollywood do a similar braid with colored eggs in it. I believe that it had some sort of flavoring in the rich dough, though, and I wanted to go for something sweet, something like challah. Instead of falling back to my usual challah recipe, I did a quick search and came upon this recipe for a braided Easter bread at Allrecipes.com. By combining the shape of Paul's bread with the basic recipe from the other bread, I think I reached an excellent balance - not to mention a gorgeous-looking loaf.
The dough was very easy to handle, though it did take quite some time to rise, as many rich doughs do. While the dough was rising the first time, I dyed a few eggs. I used raw eggs, as they will cook in the oven, and food coloring as a dye. The recipe for dye is simple: 1 tbsp white vinegar, 1/2 cup water and as much food coloring as you want. I tried to go for bright colors and used loads of coloring. After the eggs had been in the dye for about 5 minutes, I took them out and patted them dry. The eggs were inserted gently into the dough after it had been shaped and had risen a second time. I brushed the dough with an egg wash and popped it into the oven.
The bread tastes like a sweet challah, a little eggy and a little buttery. It's delicious, and perfect with butter and jam or with a large brunch. The leftovers (minus the eggs) make great toast or french toast. If you have any leftovers, that is.


Easter Egg Challah
(from this recipe)
3 cups all purpose flour
1/4 cup sugar
1 tsp salt
2 1/2 tsp (1 package) active dry yeast
2/3 cup milk, warm, 110F (low fat is fine)
2 eggs, room temperature
2 tbsp butter, very soft
3 raw eggs, dyed (as above) if desired
1 egg, lightly beaten with 1 tbsp water (for egg wash)


In an electric mixer fitted with a dough hook or in a large bowl, combine 2 cups flour, sugar, salt, yeast and milk and mix to combine. Beat in eggs, one at a time, making sure that the first one is well incorporated before you add the second. Add butter, but into small pieces, and beat until completely absorbed. Add remaining flour 1 tbsp at a time, until the dough pulls easily away from the side of the bowl.
Knead dough lightly for about 3 minutes on a lightly floured surface until it is very elastic, then place in a lightly greased bowl and cover with plastic wrap. Let rise for about 2 hours, until doubled in size.
Gently deflate dough into a rectangle and divide it, lenthwise, into three equal pieces. Roll out until pieces are about 16-inches long. Braid together, tucking the ends underneath the loaf. Place on a greased baking sheet (I used a silpat) and cover with a clean dishtowel. Let rise for 60 minutes.
Preheat oven to 350F.
Place three raw, dyed eggs gently into dough and brush the loaf with the egg wash.
Bake for 36-40 minutes, until rich golden brown.
Cool completely on a wire rack before serving.
Makes 1 loaf.


Note: All my eggs were at room temperature when I started. The cooked eggs are safe to eat, so go for it if hard-eggs are your thing!


Friday, April 14, 2006

Calzones


A calzone is sort of like a piece of pizza that has been folded into a pocket, or a turnover. It is made of pizza dough with some sort of filling on the inside. The filling almost always involves at least one type of cheese, though meats and vegetables are common inclusions.
There is some controversy over the calzone and it stems from the sauce. A lot of people think that there should be no sauce inside of the calzone, just filling. They believe that the calzone should be serve with or dipped into sauce. There are others who feel that there should be sauce inside the calzone. Since it looks like something that should be portable, they feel that the calzone should be a self-contained meal.
I am open to both ways, though I am picky about my fillings. I recall ordering a calzone at a local Italian restaurant, as a child, a getting a football-sized mound of cheese with some dough wrapped around it. It was revolting - and I loved cheese. Needless to say, I avoided the dish for many years after that experience, but once I realized that not all calzones were like that, I began to indulge from time to time.
I like a little bit of sauce in my calzones, with more on the side. I like only a little bit of cheese and a lot of other filling - vegetables, sausage, etc - even though cheese and sauce is all you really need to have a good calzone. I used my recipe for basic pizza dough to make the pockets, rolling it fairly thin. The most important thing in calzone making is to pinch the dough shut tightly so that the filling doesn't escape. This is not my strong suit. I suggest using a fork to press the edges together. Make sure to cut a slit or two in the top of the calzone with a sharp knife, or no amound of pinching will prevent some leakage.
The recipe below gives you a lot of options. Once you have the dough ready, you can fill it with just about anything. The cheese, veggie and meat options are all simply suggestions. I like mine with mushrooms, though other excellent combinations are: broccoli-ricotta, chicken-mushroom, spinach-ricotta-mozarella, chicken-sausage-mozarella, ricotta-mozarella....


Calzones
cheeses: mozarella, ricotta
veggies (pre-cooked) : broccoli, spinach; mushrooms
meats (pre-cooked): sausage, chicken
marinara sauce: optional
Preheat oven to 400F.
Divide the pizza dough into 6 equal pieces and let rest for a few minutes. Working with once piece at a time, roll out into a thin, flat circle, about 1/4-inch thick. Spread half of the circle with filling of your choice (a little bit of sauce topped with a pile of meat/cheese/veggies) and fold over the other half of the circle. Pinch tightly with the prongs of a fork to seal. Place on parchment-lined baking sheet.
Repeat with remaining dough.
Cut a small slit or two into each calzone with a sharp knife and bake for about 20 minutes, or until golden brown.
Serve hot.
Makes 6.


Note: The calzones can be frozen when they are filled but unbaked. They will take longer to bake, but they can be placed directly into the oven from the freezer - on a baking sheet, of course.

Thursday, April 13, 2006

Cooking School: Sponge Cake


This cooking school class is about technique because the thing about sponge cakes is that they're not very exciting. They have a wide, open crumb and a relatively coarse texture when compared to butter cakes. This texture is, of course, what gave them the name "sponge cake" in the first place. Though they are not usually the cakes most likely to melt into your mouth, their unique texture makes them them very easy to handle and quite useful. They hold together much better than a crumbly butter cake and are perfect for slicing and filling with jam, rolling into a jelly-roll with whipped cream or even enrobing in chocolate to make a petit four.
Filling a sponge cake has many advantages. First, it offests the slightly dryness that they tend to have. Because the moisture from the filling is so readily absorbed by the cake, it dramatically changes the texture - usually for the better. Sponge cakes can also have a sweet sugar or other flavor of syrup drizzle over them to enhance their texture and flavor, but I prefer to stick with something simple. In the cake pictured here, I used lemon curd, though the combination of lemon curd and raspberry jam together is unbeatable.
To make a cake, simply beat everything until fluffy. Beat the egg yolks, then beat the egg whites and fold into the yolks. Sift flour over the top of the mixture and fold that in, too. Sifting the flour is very important, otherwise you will have hard, unplesant lumps of flour in your cake.
Though I like the slightly eggy - and in this case also lemony - taste of sponge cake with a simple jam or curd, I highly recommend topping it with whipped cream. It adds more moisture to the cake and just makes the whole thing come together. Otherwise, use the cake to make other, more exciting desserts.


Basic Sponge Cake
4 eggs, separated and at room temperature
1/2 cup plus 2 tbsp sugar
1/2 tsp vanilla extract
1/2 tsp lemon extract or 1 tsp lemon zest.
1/2 cup cake flour, sifted -- crucial for avoiding lumps of flour!
1/4 tsp salt
1/4 tsp cream of tartar


Preheat oven to 325.
Grease only the bottom of a 9-inch round cake pan and cover with a circle of parchment paper. Do not grease the sides of the pan.
In a large bowl, beat egg yolks until light, gradually adding in the sugar. Add in vanilla and lemon and set aside.
In a medium bowl, beat the egg whites until frothy, about 1 minute at high speed, then beat in the salt and cream of tartar. Continue beating until the eggs reach soft peaks. Fold egg whites, working in 3 or 4 batches, into the yolk mixture.
Sift the flour over the egg mixture, again working in 3 or 4 batches, and gently fold it in. When the batter is uniform, pour into prepared cake pan and bake unil a tester comes out dry and the top of the cake springs back when gently pressed, about 35-45 minutes.
Allow cake to cool in the pan before cutting around the sides with a sharp knife and turning it out.
Slice the cake into 2 or 3 layers (or squares) and fill as desired.

My recipe for Lemon Buttermilk cupcakes is up, too. They're delicious!

Tuesday, April 11, 2006

Chocolate Espresso Cupcakes


With Easter coming up, I knew that I already had the perfect idea: egg shaped cupcakes, thanks to Reynold’s Fun Shapes bakeware. How’s that for product placement? Actually, I really liked these. They are small foil pans, cupcake sized, that come in three shapes: hearts, stars and, of course, eggs. They sell them in the baking aisle of my grocery store, along with their usual assortment of cupcake wrappers. Though they are slightly larger than ordinary cupcakes, they are also slightly shallower, so they take the same amount of time to bake. You can eat your cakes right out of the pan, or pop them out once the cake has cooled. I didn’t grease the pans, but had no problems removing the cakes.
The cakes shown here are Chocolate Espresso cupcakes and Lemon Buttermilk cupcakes. The Lemon Buttermilk Cupcake recipe can be found here, but this post is about the chocolate espresso combination.
Obviously, the espresso was courtesy of my new espresso machine. How could I resist using the chocolate-coffee combination when top quality ingredients were at my fingertips? If you don’t have an espresso machine, go ahead and use strong coffee or instant espresso powder dissolved in the appropriate amount of water. The taste in the finished cupcake will be about the same.The cakes are delicious. They have a very adult flavor, which means that they aren’t for everyone. There is a slightly bitter undertone that is a result of the combination of cocoa powder and espresso that makes them taste like delicious dark chocolate. Of course, if you don’t like dark chocolate, I ‘d advise against making these; they’re nearly black! In terms of texture, they are very light, tender and moist. I used a simple vanilla glaze so I could decorate them easily, but the two best frosting options are a chocolate glaze or a fluffy chocolate frosting, like the recipe given below.


Chocolate Espresso Cupcakes
6 tbsp cocoa powder
3/4 cup all purpose flour
1/4 cup sugar
1/2 cup brown sugar
3/4 tsp baking soda
1/4 tsp salt
1 egg
1/3 cup espresso, cooled
1/2 cup buttermilk
2 tbsp vegetable oil
1 tsp vanilla extract

Preheat oven to 350F. Place 9 baking cups on a baking sheet (or 12 muffin liners in a muffin pan).
In a large bowl, sift together cocoa, flour, sugars, baking soda and salt.
In a medium bowl, whisk together espresso, buttermilk, egg, vegetable oil and vanilla extract. Pour the espresso mixture into the flour mixture and stir to combine. Evenly distribute batter into prepared cups.
Bake at 350F for 15-19 minutes, or until a tester comes out clean.
After 5 minutes of cooling on or in the pan, remove to a wire rack to cool completely.
Makes 9 egg-shaped cakes or 12 regular cupcakes.


Easy Chocolate Frosting
(not "original", but very common)
¼ cup butter, very soft
½ cup cocoa powder
1/3 cup milk (nonfat is ok)
1 tsp vanilla extract
3-4 cups confectioners’ sugar


Combine butter, cocoa, milk, vanilla and 3 cups confectioners sugar in a large bowl. Beat with an electric mixer until thick, smooth and fluffy, adding a few extra tablespoonfuls of powdered sugar at a time to reach desired consistency.
Makes about 2 cups.


Monday, April 10, 2006

Silken Raspberry Mousse


A lot of tofu mousses involve chocolate. Not that there is anything wrong with that, but they can be rather heavy and, frankly, I like fruity things during the spring and summer far more than I like chocolaty things. I haven’t done many mousses with fruit and tofu, but, in this case, decided to give it a shot.
And I’m glad that I did.
While I wouldn’t say that this has the same light texture as a traditional mousse, it is surprisingly light. I would describe it as halfway between a mousse and a pudding. I combined tofu, raspberries and sugar in the food processor and blended until smooth – simple, right? Silken tofu is the best for a dish like this because it will produce the creamiest results, but I’ll let you in on a little secret: I’ve used regular tofu, too, and it works pretty well. The main difference is that the regular tofu will not get quite as smooth as the silken, even after some time in the food processor. It really isn’t a huge difference, but if you have the option to use silken, try to take it.
Raspberries are great right now. They’re fresh and all the ones at the shops around me are sweet. Despite their sweetness, I wouldn’t recommend decreasing the amount of sugar that I’ve included in the recipe below. It is just enough to temper the slight tartness of the berries and completely mask the flavor of the tofu. People will definitely not know they're eating something healthy when they eat this – and it is healthy. It is quite low calorie and low fat, not to mention full of fruit and protein from the tofu. I’m tempted to skip dinner and just have a double portion of this dessert as a meal.
The mousse will firm up a bit after a few hours in the refrigerator and it will keep, covered, for a few days. Make it in advance and bring it out as a dessert for a springtime party. I used little ice cream dishes, but martini glasses would make a great serving dish, too.


Silken Rasperry Mousse
12-oz. tofu (silken)
1 1/2 cups raspberries
1/2 cup sugar
1/2 tsp vanilla extact

Combine all ingredients in a food processor and blend until very smooth, about 6 minutes. Divide into individual serving dishes and chill for at least two hours before serving. Garnish each portion with whole raspberries.
Serves 4.

Sunday, April 09, 2006

New Toy


I got a new toy for my kitchen last week. Want to read about it? Check out my post on Slashfood!

Friday, April 07, 2006

Kissables Cookies


When I first saw the new Hershey's Kissables a few months ago, I wanted to eat them by the handful. They are smaller than a regular Hershey's Kiss and covered in a thick, bright candy shell. They are very similar in principle to an M&M, but larger and rather more substantial. Like M&Ms, the different colors do not have corresponding flavors; they are just there to look pretty.
Once I got over the cutness and started seeing the Kissables sold in larger bags, I decided that I wanted to try them in cookies. You could use any candy-coated chocolate in these cookies, but the Kissables are so cute!
I wanted to keep the cookies fairly white to highlight the candy bits, but I didn't want to turn them entirely into a sugar cookie, either. So, I used mostly white sugar in these, which gave them a beautiful light color and a nice, mild flavor. The bit of brown sugar and honey I added was to ensure that the cookies stayed moist and had a bit of chew to them. The vanilla flavor came through fairly well, too.
The cookies looked slightly underdone when I tooke them out of the oven, but they cooled perfectly. The had crisp edges on the first day - a feature that made them incredibly addictive - but they stayed nice and soft, with a bit of chew than contrasted nicely with the crispness of the candy coated Kissables.


Kissables Cookies
(or any other candy-coated chocolates)
2 1/2 cups all purpose flour
1/2 tsp baking soda
1/2 tsp baking powder
3/4 tsp salt
3/4 cup butter, softened
1 cup sugar
1/4 cup brown sugar
2 tbsp honey
2 large eggs
1 tsp vanilla extract
2 cups Kissables (or M&Ms)


Preheat oven to 375F. Line a baking sheet with parchment paper.
In a medium bowl, whisk together flour, baking soda, baking powder and salt.
In a large bowl, cream butter and sugars with an electric mixer until light, about 4 minutes. Beat in honey followed by the eggs, adding them one at a time. Mix in vanilla. With the mixer on low speed, gradually add the flour mixture into the butter mixture until it is just combined. Stir in Kissables.
Drop by heaping tablespoons onto prepared baking sheet, leaving about 2 inches between cookies.
Bake at 375F for 9-12 minutes, until golden at the edges. Allow to cool on baking sheet for about 5 mintues before transfering to a wire rack with a spatula to cool completely.
Makes 3 dozen fairly large cookies.

Thursday, April 06, 2006

Cooking School: Loaves and Muffins


The recipe comes from Epicurious and is actually for muffins, not for a loaf. There are several problems with this. First of all, I love muffins, but I love loaves more. They transport easily, wrap well and can be served in any size portion. Personally, I like to work my way through a few thin slices during the day and spreading out the enjoyment, as opposed to eating one muffin and having done. Recipes that make twelve muffins can easily be converted to a loaf and vice versa. Recipes that are for either more or fewer muffins can pose a problem and, unfortunately, this is one of those recipes.
The original recipe for Ginger-Pumpkin Muffins makes 18 muffins and is precise enough (1/2 cup plus 1 tbsp buttermilk; 3/4 cup plus 2 tbsp pureed pumpkin) that I never wanted to bother dividing it into a smaller batch. Not to mention that I wouldn't want to pass up the chance to eat more of this.
After many false starts and a few overfilled pans, I have decided that the best way to approach the situation is by first removing the excess batter from my bowl, that way I never have to "eyeball" how high to fill up my loaf pan. Using a 1/4 cup measure as a scoop, I pour out 6 large muffins into a lined muffin tin. I pour the rest into a greased 9x5-inch loaf pan and set two timers. The muffins take a much shorter time to cook, as you might expect, but a loaf pan is small enough to accomodate the muffin pan alongside in just about every oven.
The most important thing to note, when making a conversion like this one, is that mose quickbread loaves take about the same time to bake, no matter their flavor. This is how I get a ballpark of when to check my loaves when I'm working on new recipes. A 9x5-inch loaf pan will usually take 50-60 minutes at 350 or 375F. I check them before I expect they will be done and I always use a tester, too.
This is one of my favorite recipes. It is full of flavors that I love - pumpkin, ginger, molasses, buttermilk - and it tastes great. If you need any more assurance, just ask Cathy what she thinks of it, since I sent a loaf to her a while back. The muffins, or the loaf, will be moist, flavorful and very tender. I love the candied ginger bits that are sprinkled throughout the bread. It is fantastic with coffee or tea and, while the spices are often reserved for winter and fall, they work surprisingly well in spring, too.


Pumpkin Gingerbread
(Adapted from Epicurious)
2 cups sifted ap flour
1 tbsp ground ginger
2 tsppumpkin pie spice
1 1/2 tsp baking soda
1/4 tsp salt
3/4 cup plus 2 tbsp cooked pumpkin puree (canned or fresh)
1/2 cup plus 2 tbsp buttermilk
1 tsp vanilla extract
2 eggs
1 cup golden brown sugar
1/2 cup unsulfured (light) molasses
1/4 cup vegetable oil
1/3 cup minced crystallized ginger
1/2 cup raisins

Preheat oven to 375F. Line 6 muffin cups with paper liners (or lightly grease) and lightly grease a 9x5-inch loaf pan.
In a medium bowl, sift together the sifted all-purpose flour, ginger, pumpkin pie spice, baking soda and salt. Set aside.
In a small bowl, whisk together pumpkin puree, buttermilk and vanilla extract. Set aside.
In a large bowl, beat together eggs and sugar until light, about 2 minutes. Beat in oil and molasses. Working with the mixer at low speed, add the flour mixture and the buttermilk mixture to the eggs in three additions, ending with the flour mixture. Stir until just combined, then stir in the ginger and raisins.
Using a 1/4 cup measure, scoop batter into the 6 prepared muffin tins. Pour the remaining batter into the prepared loaf pan.
Bake the muffins for 22-26 minutes at 375F.
Bake the loaf for 50-60 minutes at 375F.
Check both muffins and loaf with a tester, making sure it is clean, before removing from the oven.
Remove from pans and cool on a wire rack.
Makes 1 loaf and 6 muffins.


Note: I have used darker molasses for this bread as well. It works just fine and tastes delicious, but the bread will be much darker and slightly more likely to burn in the oven. You may want to cover the loaf with a sheet of foil in the last 15 minutes of baking, if using a very dark molasses

Tuesday, April 04, 2006

Rustic Country Baguettes

These baguettes are a variation on the Rustic Country Bread that I did a few weeks ago. That dough is not only delicious, but versatile. It works well in any shao, whether it is a large loaf, individual sized dinner rolls or baguettes. The one thing that changes is the baking time.
As I have mentioned before, though it is definitely worth rehashing, the best way to check if a yeasted bread is baked thoroughly is by using an internal read thermometer, or a meat thermometer, to take the temperature at the center of the bread. When the internal temperature reaches 200-210F, the bread is done. This will produce consistently cooked bread with not a whole lot of effort on your part. I mean, how hard is it to stick a thermometer through the bottom of a loaf?
I used part whole wheat flour in these baguettes, though you could certainly use all bread flour. The bread flour gives these baguettes a much better texture than all-purpose flour would. Adding a spray of water into the hot oven before baking will give these a great crust. To refresh the bread for serving, or the next day, simply place the loaf in a 350F oven for about 5 minutes.


Rustic Country Baguettes
Sponge:
1 tbsp active dry yeast
1 cup water, warm (110F)
1 cup bread flour
Dough:
1 cup whole wheat flour
3-4 cups bread flour, approximately
1 1/3 cups water, warm (110F)
2 tbsp honey
1 tbsp salt


Make the sponge:
Dissolve yeast in warm water and stir in flour. Let rest for at least one hour (or up to 5, as time permits).

Make the Dough:
In a large bowl, combine the sponge, 2 cups of flour, water, honey. Add salt and remaining flour, stirring in about 1/4 cup at a time until the dough comes together into a ball. Turn out onto a lightly floured surface and knead until elastic - about 5 minutes. Place in a lightly greased bowl to rise until doubled, about 1 hour.
Turn dough out onto a lightly floured surface and gently deflate. Divide the dough into three even pieces and shape into oblond baguettes, about 16-inches long. Place on a baking sheet sprinkled lightly with cornmeal or flour. Cover baguettes with a clean dish towel and let rise for 45 minutes.
Preheat oven to 450F.
Slash the tops of the baguettes 4-5 times with a very sharp knife. Bake for about 30 minutes until the crust is golden brown and an instant read thermometer (meat thermometer) inserted into the end of one of the loaves reads 200-210F.
Cool completely on a wire rack before slicing.

Makes 3 baguettes.

Monday, April 03, 2006

Spicy Carribean Ginger Stew


One of my favorite restaurant dishes is served at the Delta of Venus in Davis, California. Davis is a small university town outside Sacramento. The area is agriculture-heavy and, combined with the naturally liberal atmosphere of college towns, there are a lot of good food options there.
Delta of Venus is a restaurant/café just a few blocks away from campus. The best descriptor of the place would be “free spirited.” The employees are super nice, the baked goods are made by, I believe, the owner’s mother, the have live music on the weekends and the food is amazing. While they serve breakfast and lunch everyday, in addition to a lot of coffee options, it is their weeknight Caribbean dinners that keep me coming back whenever I'm in town.
All the Caribbean options are delicious, but one intriguing aspect of the Delta of Venus is that they have a lot of vegetarian and vegan options – including on their Caribbean menu. My favorite dish there is the ginger seitan. Seitan is a vegetarian faux-meat product made out of wheat and it has a very meaty texture. It also absorbs flavor easily, so it is great in flavorful soups. If you don’t want to use seitan (I found it in a natural foods store), brown some chopped beef in a skillet and add it to the vegetables before simmering the stew. My version here isn't the same as the Delta of Venus version, not by a long shot. Not only did I not bother with the sides of fried plantains, collard greens and red beans and rice, but theirs uses different vegetables, including cauliflower and peppers, but the basic idea is very similar. I used a tiny pinch of powdered habanero peppers – it only takes a tiny pinch, since the powder is so hot – but if you cannot get it, use more cayenne to increase the heat. I like it spicy. In the same sort of way that Venus inspired Botticelli, I guess you could say that the Delta of Venus inspired me. Overdramatic? A bit. But the food really is great.


Spicy Caribbean Ginger Stew
1 medium sized onion, diced 4
cloves garlic, minced
1 tbsp grated, fresh ginger
3/4 cup diced carrot (1-2 large)
2 tsp cumin
¼ tsp cinnamon
¼ tsp cayenne pepper
2 tbsp tomato paste
1/8 tsp dried powdered habanero peppers (trust me)
10-ounces seitan (1 package)
1 can (15-oz) drained crushed tomatoes, chopped
4 cups vegetable stock
2 cups peeled sweet potatoes, in 1-inch pieces
salt and pepper


In a large dutch oven, heat a little bit of olive oil over medium heat. Sautee the onion until slightly softened, about 5 minutes. Add garlic and ginger and cook for an additional 3-4 minutes, until fragrant. Add all the rest of the ingredients, salt and pepper to taste, and cover. Bring to a boil, then reduce the heat to a low simmer. Cook for 1 hour, or until carrots and sweet potatoes are tender.Serve hot, with crusty bread, fried plantains or red beans and rice.
Serves 4.

*Note: see text, above, for instructions on non-vegetarian version

Saturday, April 01, 2006

Flourless Peanut Butter Cookies


I would not go so far as to say that these are the ultimate peanut butter cookie, but flavor-wise, these would be very, very close. Though I do enjoy the traditional recipe and the crunchiness of the PBJ version, there is nothing to take away from the peanut butter flavor of these cookies.
The recipe is from and issue of Everyday Food that I have had for ages now, waiting for the perfect opportunity to make them. I originally took note of the recipe because of its simplicity. It's a good choice for people who do not bake or only have experience baking prepackaged doughs, since there is no risk of doing anything like over-mixing. The single ingredient that might not be in the cupboard of a non-baker is baking soda, and if they don't have it, they can spend the $0.99 to buy a box.
The cookies are flourless, held together with an egg and sugar. They bake into a tender, crumbly cookie that melts into your mouth but is difficult to eat while driving, on account of the number of crumbs that will end up on your shirt. And, of course, how could you go wrong with chocolate chips? Peanut butter and chocolate are a natural pairing, rich and addictive. The original recipe called for adding some peanuts, as well, but I felt that big pieces of peanut would overwhelm the texture of the cookie and I think that I was right. Once again, I used the Milk Chocolate and Caramel Swirl Chips, but regular chocolate chips are an excellent, more classic choice here. Personally, I would opt for using milk chocolate chips if you can find them, rather than dark chocolate in these.


Flourless Peanut Butter Cookies
(originally from Everyday Food)

1 cup smooth peanut butter (I used a national brand)
3/4 cup brown sugar
1 large egg
1/2 tsp vanilla extract (optional)
1/2 tsp baking soda
1/4 tsp salt
1 cup chocolate chips

Preheat oven to 350F. Line a baking sheet with parchment paper.
In a large bowl, beat together all ingredients until smooth, adding chocolate chips at the end of mixing.
Drop by tablespoonfuls onto prepared baking sheet and flatten slightly with a moistened finger.
Bake for about 10-13 minutes at 350 F, until golden brown at the edges.
Cool on pan before removing to wire rack to cool completely.
Makes 2 dozen.